

Birmingham Southern Model Railroad
Scratch Built Structures
When I started building my layout I used cardboard to make foot prints for the buildings in order to make sure the planned track would fit where I wanted it. At some point I knew that I would have to add some structures, especially when we started operations, to give the layout a more realistic feel. Most of the prototype structures that fit the era, location and industries for my layout would be your basic steel frame, metal clad industrial buildings, or in some cases concrete block walls with built up roofs. Of course there would be some smaller structures, mostly houses that would either be wood frame or brick. As mentioned earlier, these types of structures that would fit on my layout are not readily available, so I would have to scratch build them.
When we started operations I made a few cardboard and foam core mock-ups of the industry buildings that would be served by the railroad. These would eventually have to be replaced with permanent, more detailed plastic ones. I had originally planned to make all new ones totally out of plastic, but it occurred to me to why not use the mock-ups I had already built and cover them with plastic siding and roofs, then add the details over that. A few of the mock-ups had to be modified so they would provide a better foundation for the plastic sidings, but this process proved to be very effective and relatively inexpensive. Unlike my kits, I tried to make my scratch built structures look more like the prototypes they represent. These are not detailed copies of the real things by any means – the real ones are just too big to copy on a model layout, but just a general impression of what they look like.
I’m not going to get into how I drew the plans or cut the foam and plastic for the structures – there are plenty of other sites that do that, but I will list some of the materials I used and how I put them together. I used a couple of different brands of tacky glue to apply the plastic to the foam core. These are in the materials list below. Also, I don’t have step-by-step photos of these building, since I had not originally planned on showing the procedures on my website. There are a number of pictures showing the foam/cardboard bases and then the finished plastic covered buildings.
-------------------------------------------------------------------
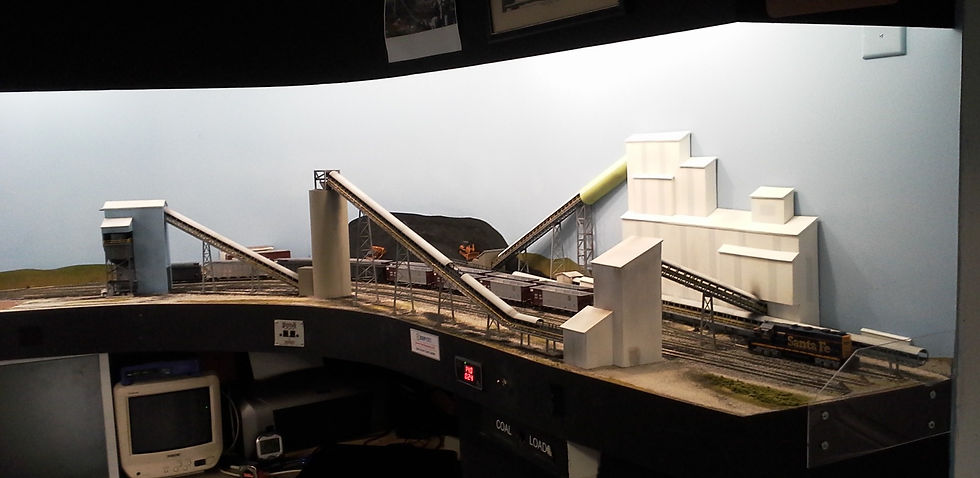
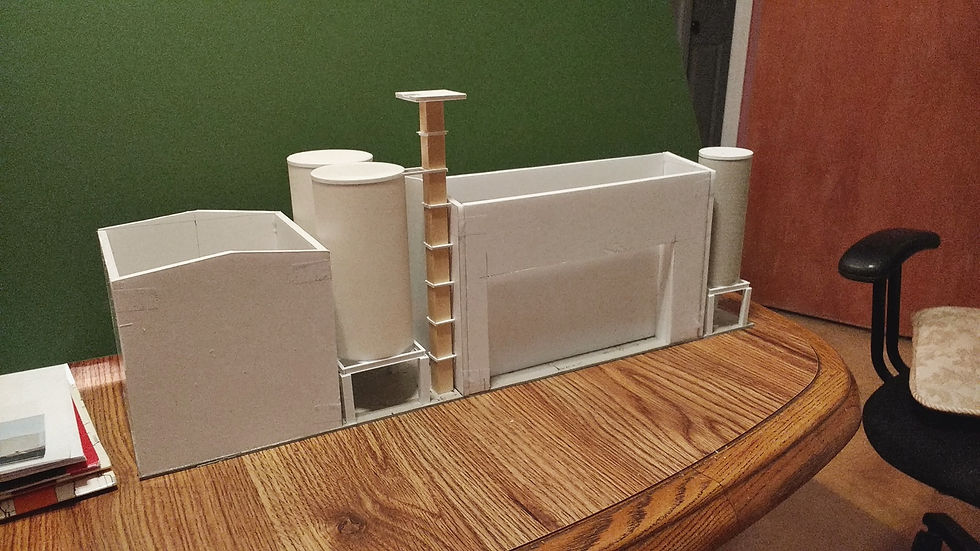
The first structures I tried this technique on were the ones at my Concord Coal Processing Plant. These consisted of a few background buildings (one rather tall) and two stand-alone structures. I used a photo of the actual plant to design my version. The first set of pictures shows the main processing building and the drying tower foam core bases and then after the siding was added and painting/weathering started.

Main building and drying tower - foam core sides with mat board roof.

Main building and drying tower - foam core sides with mat board roof.

Drying tower after plastic siding and ribbed roof added. Plastic shapes used for fascia and opening framing.

Main building after plastic siding and roof added. The dark strips represent translucent lighting panels on the prototype. Smaller flats on the sides represent buildings in the distance.
The next set of pictures shows the coal loading building and a small parts storage building flat. They were made the same way as the other structures. There is another view of the coal loader in the kit-bashed section.

Coal loading building added around a loader taken from a Walthers Glacier Gravel kit

Small parts warehouse background building.
These pictures show the finished processing plant model alongside a picture of the prototype. The round storage silo in the center was made from a piece of PVC pipe. The conveyors are all from Walther's Modern Conveyor kits. The small conveyor buildings are scratch built using the same foam and plastic technique.

I uses the same technique to build the rest of my main industrial structures. The type of siding and roofing changed some from building to building to give them some variety and to be closer to the prototype. Click here to see a list of the different materials I have used so far. I still have more structures to build, and I may add or change materials, but the basic plastic over foam format will continue to be used.
The following sets of photos show structures that were all made the same way. Some have added details made of plastic shapes and/or small detail parts. All of these represent real industries in the Birmingham area. Each set has some photos of the basic foam core building and a few others taken during construction.
Precoat Metals


Vulcan Painters - background flat


This shows a comparison of the real Vulcan Painters to the model
Engineered Fillers


Performance Minerals


DeCarlo Warehouse


Southern Precision Sands


ERS Rail Transload


U S Steel Tubular Operations
This industrial complex was probably the most difficult to build. Not only is it the largest on the layout, but it has the most details. There is a main manufacturing building, a small office building, a small parts receiving/storage building and an overhead crane structure.
Here area a few pictures of the finished structure. The last picture is a Google Map image of the real pipe mill.


Google image of real pipe mill.
The best way to see the construction is this short time lapse video.
Ensley House
This is a small house in an Ensley neighborhood near Performance Minerals. It was made from plastic and cardboard. The porch roof supports are made from brass wire formed and soldered together. The roof is just shingles printed on regular copier paper.


This is the real house mine was based on.
Fairfield Yard Engine House and Sanding Tower
These structures represent the real engine house and sanding tower at Birmingham Southern's Fairfield Yard. Included are a couple of pictures of the real structures.


Power Plant
Several years ago I moved my power plant, but kept the original foam board structures. These have now been replaced with permanent scratch built ones depicting several that can be found at a local coal fired plant.


Limestone Plant
The limestone plant was just added. It is a small version of a very large one near where I live


Other scratch built structures
These are some pictures of other structures that have been made from scratch. They were made using plastic, wood, brass, cardboard and paper.

Coal loading tipple and truck fuel tank at Powhatan Mine.

Wooden trestle over Short Creek.

Office at Birmingport.

Unloading dock at Ergon Asphalt.

Convenience store/gas station in Mulga.

Mulga Town Hall and Fire Dept.